


Easy How-to instructions you can trust.
Click the drop down icon left of each question. The answer with step by step visuals will load.
*
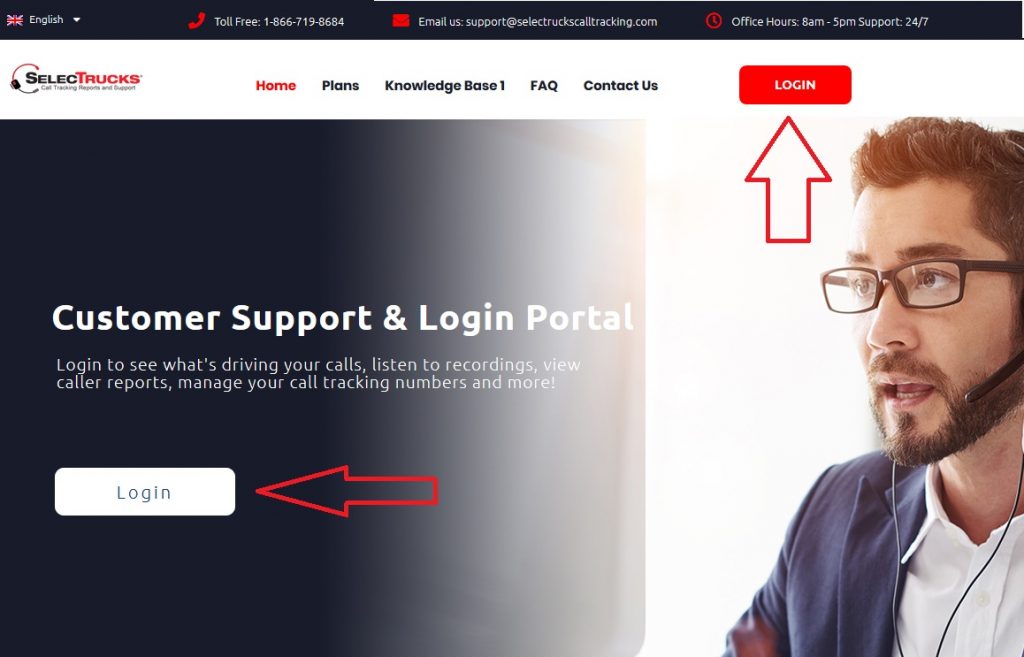
ANS. Click the Login button on the home page of this website, or in the top right hand corner of any page. You can also copy the following url and paste it into your browser window and hit enter. https://selectrucks.callerreports.com/. We encourage you to save the website “SelecTrucksCallTracking.com” to your desktop for quick login and customer support access.
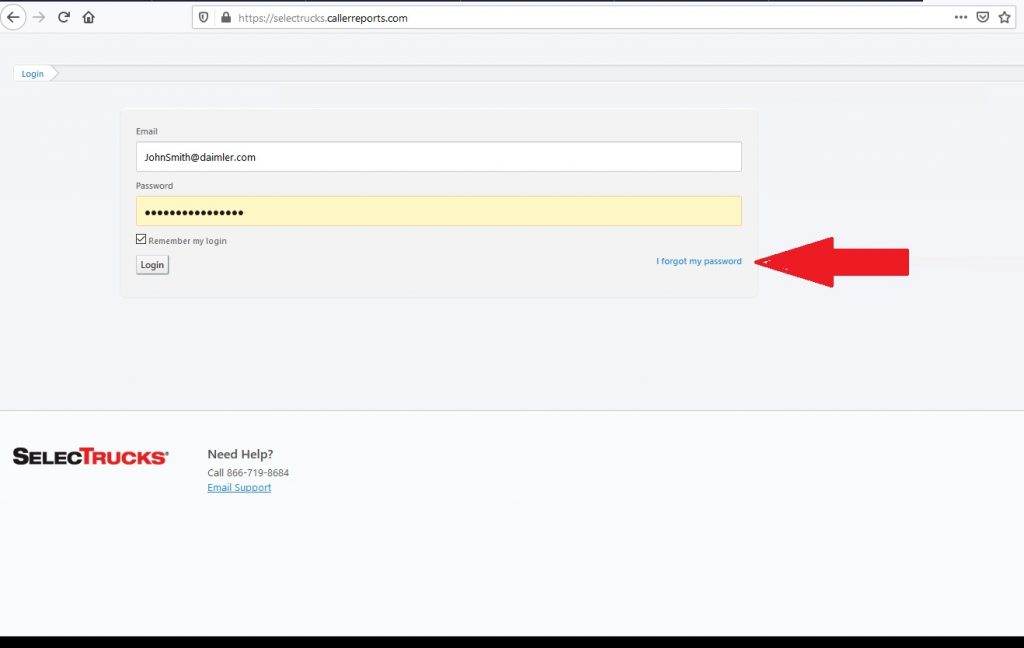
ANS. Click the “Reset Password” link beneath the login fields.
ANS. Yes, you can login anywhere there is a computer with an internet connection.
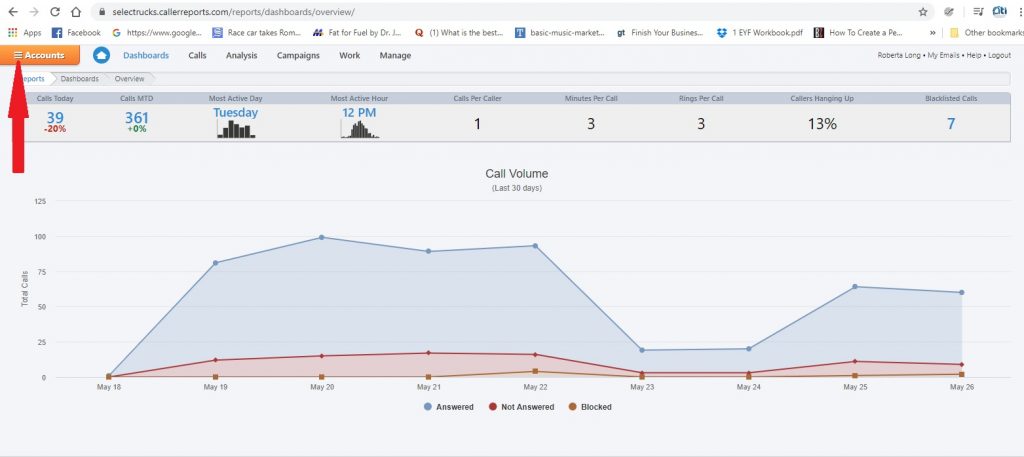
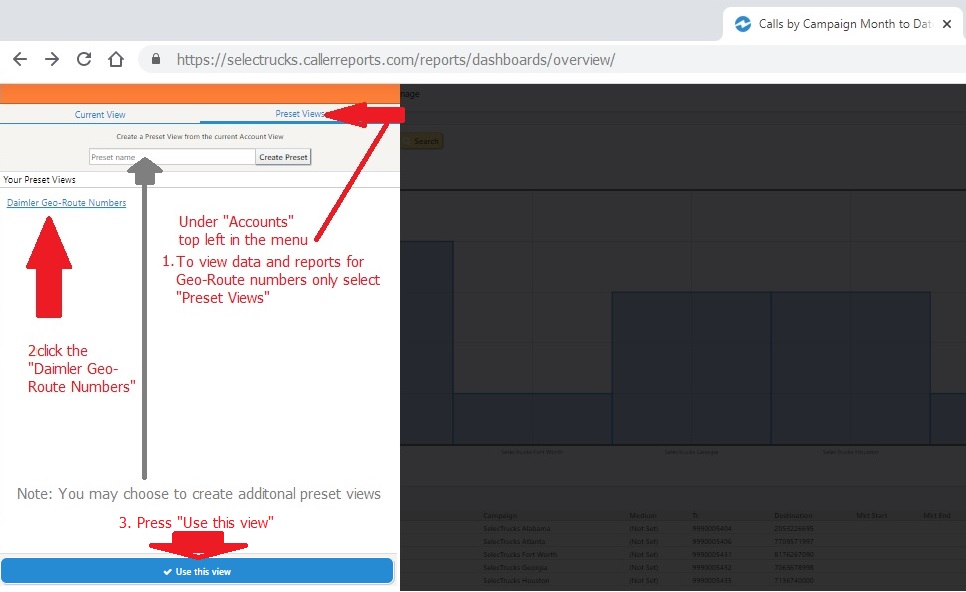
ANS. Click on “Accounts” at the top left after logging in. > Select account > Select numbers you want to look at specifically. Once you have created the view you may also create a preset views. That way you can go straight to a preset view.
Click Account, > Select each number you want to view, > Select “Use this view” button at the bottom
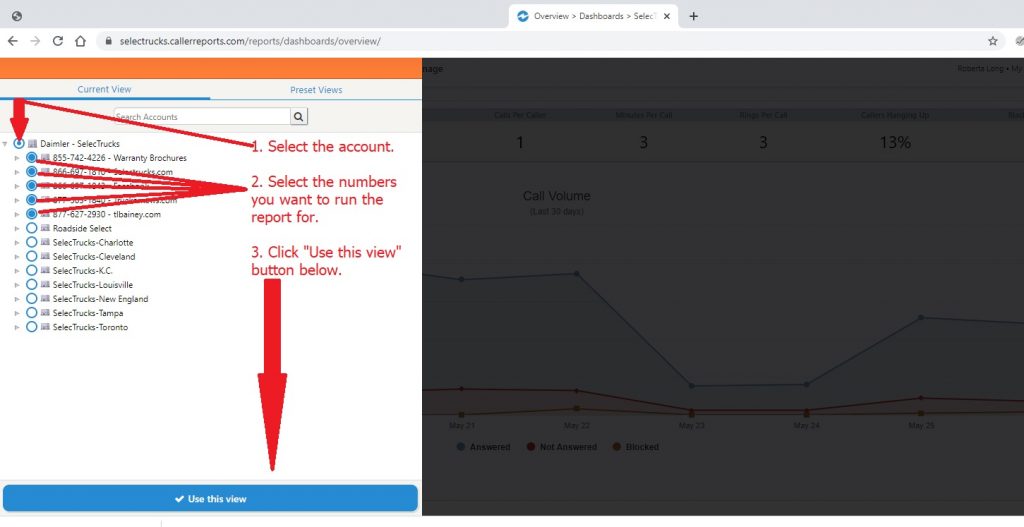
ANS. Click on “Accounts” at the top left after logging in. > Select account > Select numbers you want to look at specifically. Once you have created the view you may also create a preset views. That way you can go straight to a preset view. We have already created the “Preset” view; “Daimler Geo-route Numbers”.
To View Daimler Geo-route numbers only: Select “Accounts” after logging in. > Next Click “Preset Views”. You will then see this preset view, along with any others you may create in the future. Simply choose the preferred view and press
Click “Preset Views”. You will then see this preset view along with any others you may create in the future. Simply choose the preferred view and press
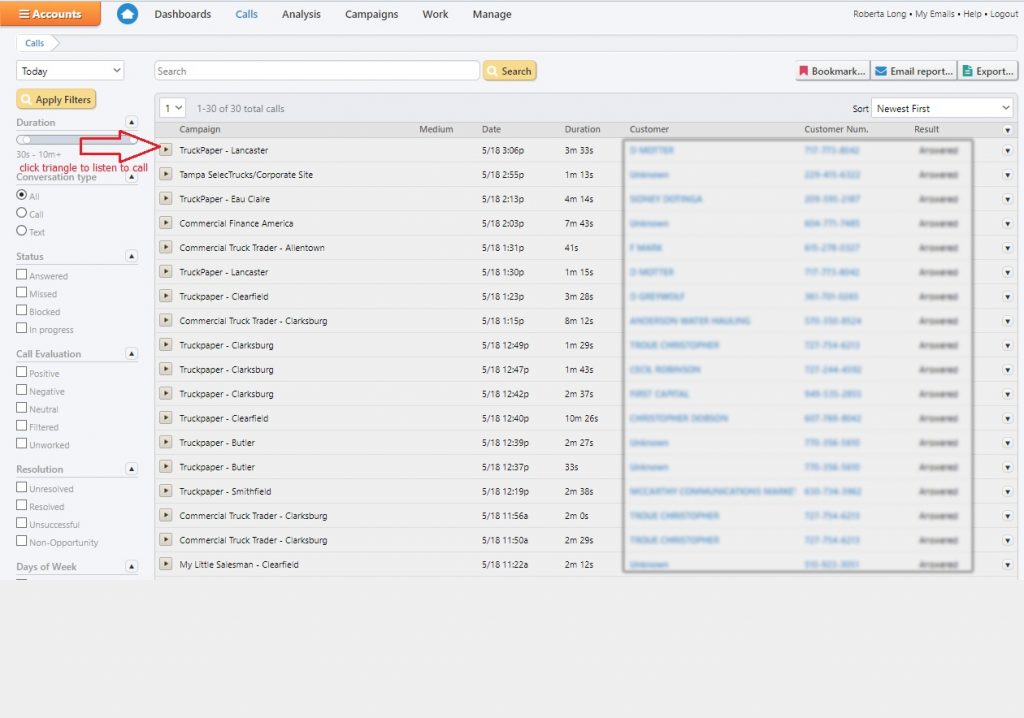
ANS: From your dashboard menu select “Calls”. A drop down menu will load. Next Select “All Calls”. You will now see all calls. To the left of any call you will see a boxed in triangle icon. You will click the arrow left of any call you want to listen to.
Note: Information in this screenshot has been blurred for privacy. You will see your data when you go to your reports.
. 
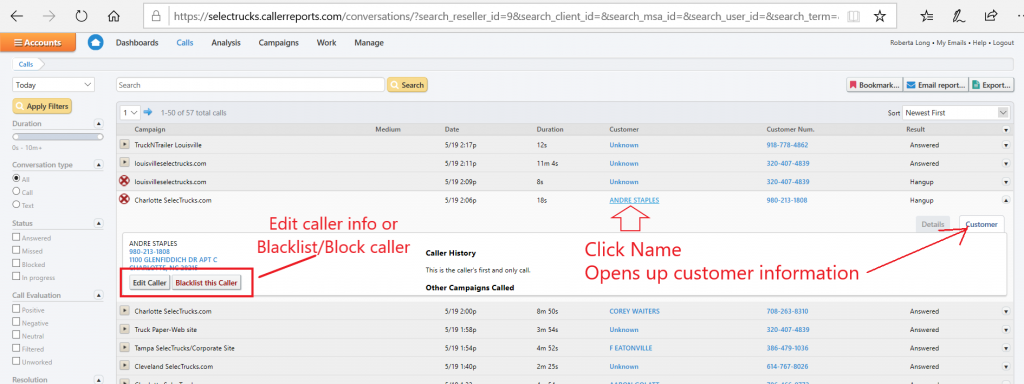
ANS. From your dashboard menu go to “Calls” > Select “All Calls” > Click on your callers name. It will expand and you will see the available customer data.
Notice at the top of the expanded window you will see “Details” or “Customer” options.
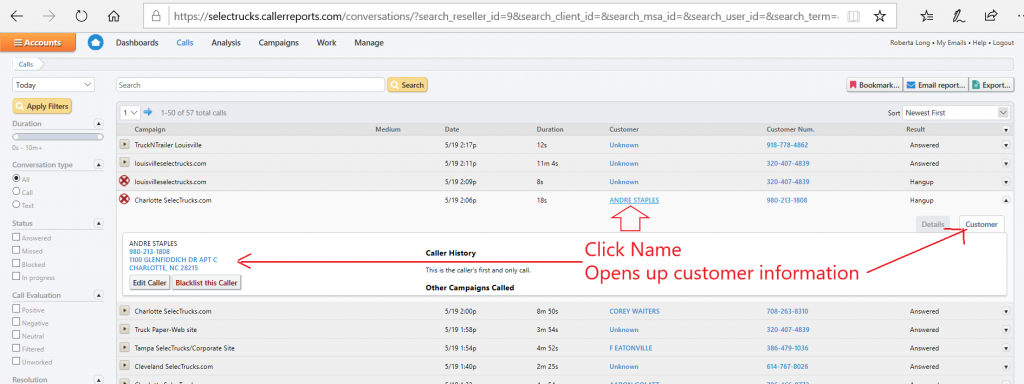
ANS. From your Dashboard go to “Calls” > All Calls. Click the Callers Name. The window will expand showing the customer info on the left. Just beneath the information you will see the option to “Edit” or “Blacklist” the Caller. (Blacklist if it’s a robo calls /solicitation/spam call.

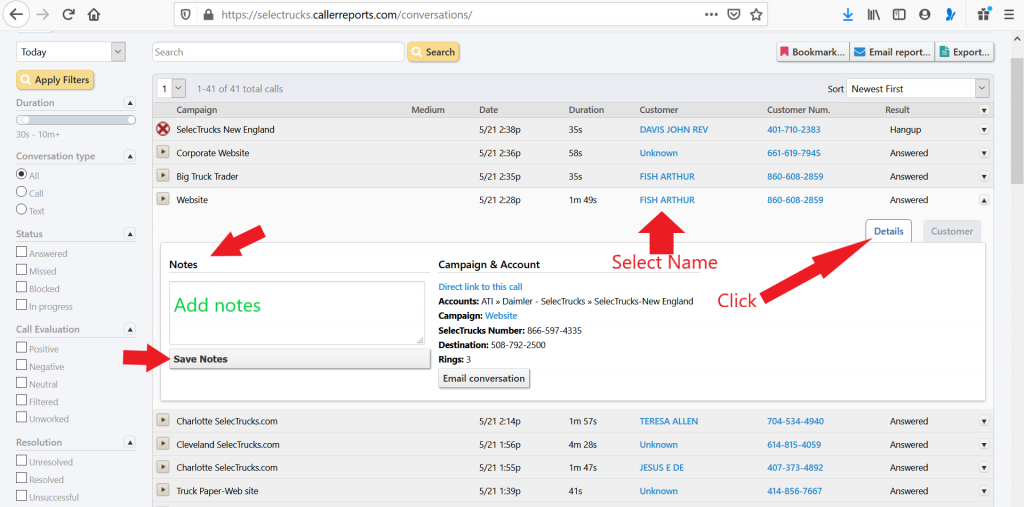
ANS. From the Dashboard go to ‘Calls” > “All Calls” > Click the callers name. The window will expand. You will see the option on the left to add notes.
Note: After you have clicked the callers name, be sure you select “Details” (on the top right of the expanded window.
ANS. In your dashboard click “Calls” > “All Calls” > Click the name of your caller. The window will expand. ON the left beneath the callers details you will see the option to Edit caller or “BLACKLIST”. Select Blacklist.
ANS. Yes, we could assign your salespeople tollfree numbers and forward them to their cellphones, when someone calls from their tollfree numbers it will record the entire conversation.
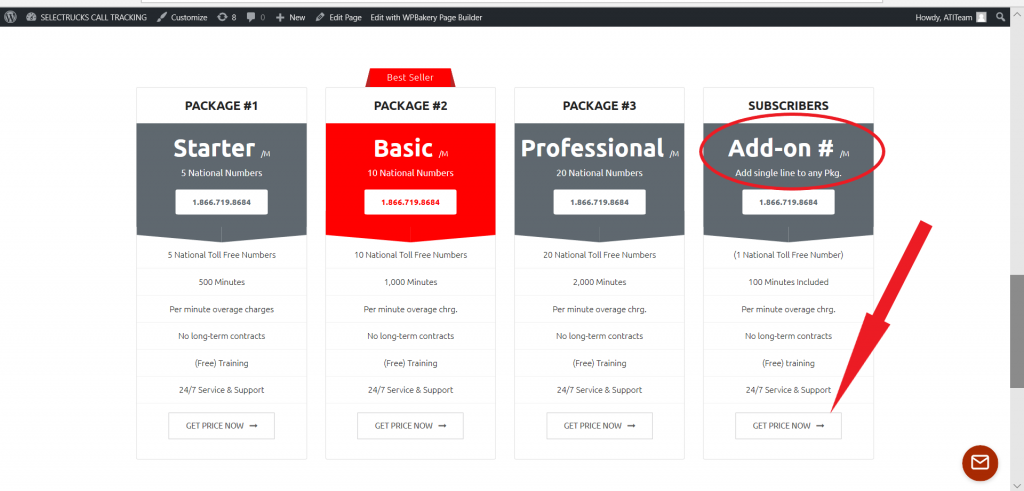
ANS. Call 1- 866-719-8684 OR or EMAIL Support@SelecTrucksCallTracking.com and we will add a number or numbers into your account in just moments. You may also “Hover” your mouse over the “Contact” tab in the page menu of this website and scroll down to “Plans”. Click on Plans. You will see the 4th option is: “Add a Single Number”. Fill out the quick form and we’ll get it added for you asap!
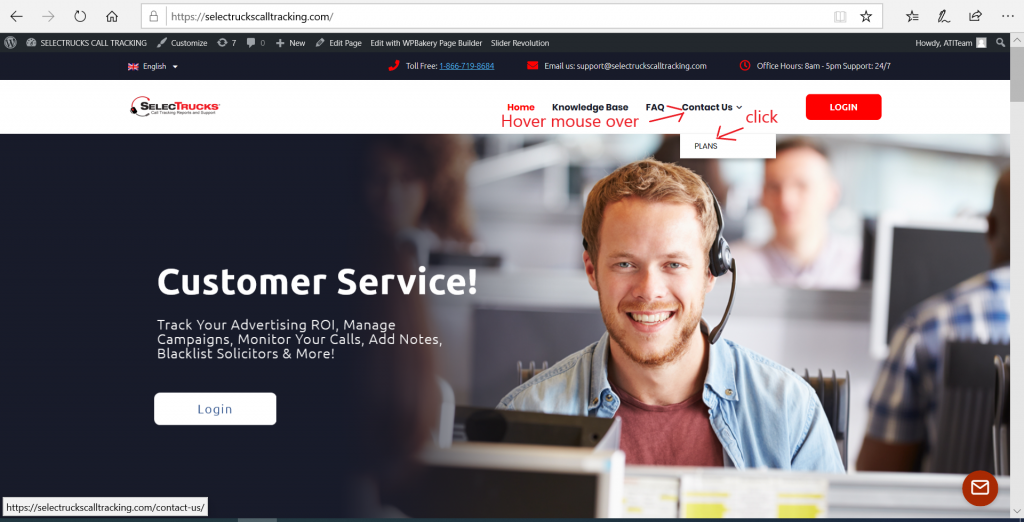
After the “Plans” pages loads simply scroll to the bottom of the page to see #4 which is the Add a Single Number to an existing package option. Simply fill out the form and we will get the number added to your account asap!
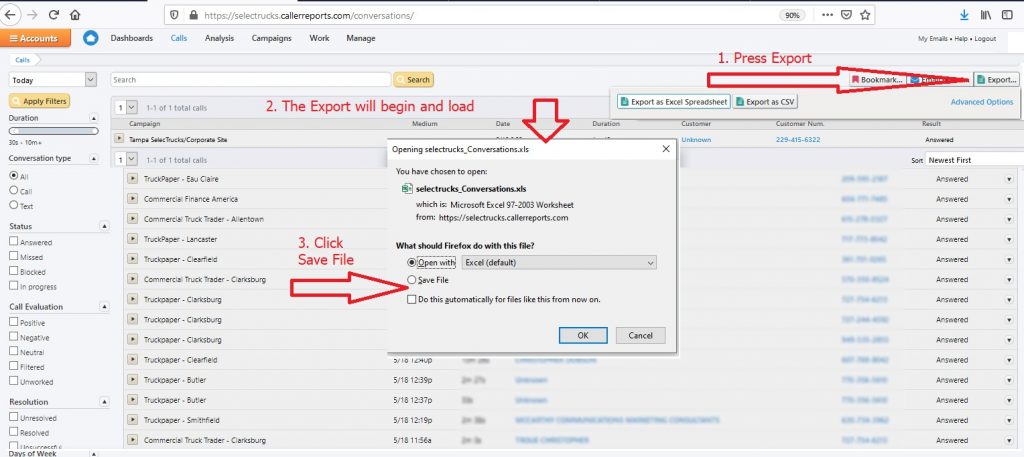
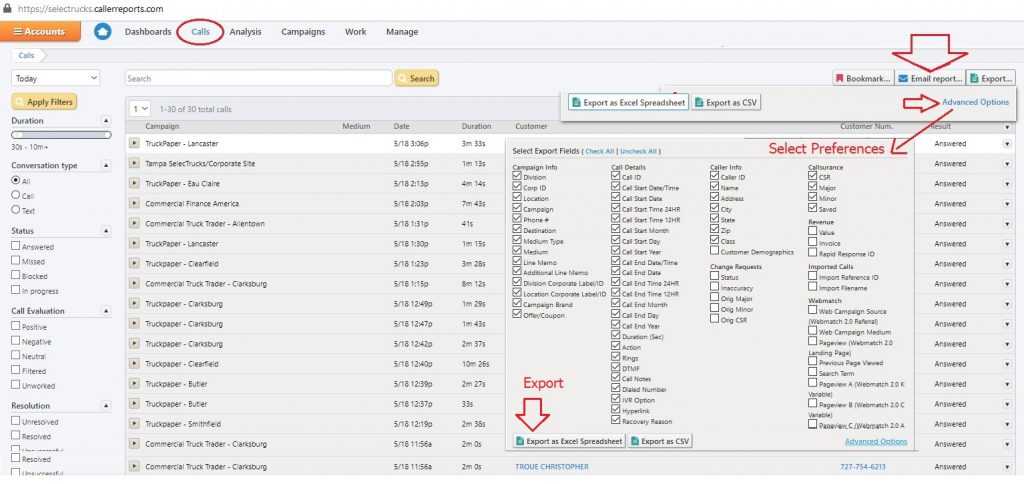
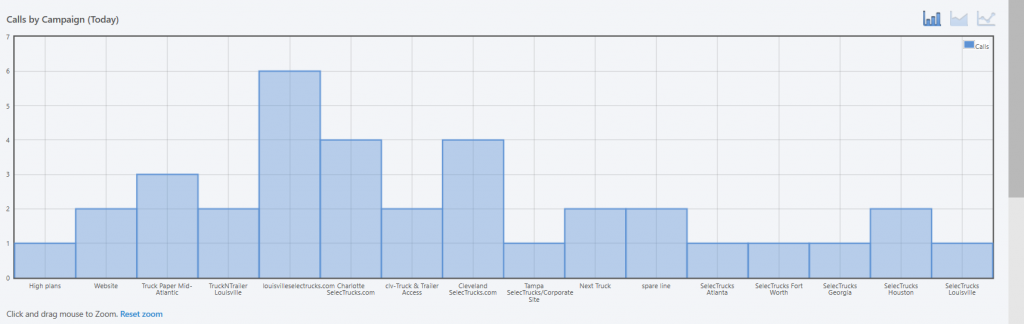
ANS. Select “Calls” from the dashboard menu. Just above the calls toward the right you will see the option to export. See Image #1 below – “Basic Export”. Beneath Basic Export See: “Advanced” Export Option.
1. Basic Export
2. Advanced Export
If you want to choose the data you export form your calls simply select “Advance” after you’ve clicked “Export”. A Window will load with options you may check or uncheck. At the bottom of the same windo you will see the options to export.
ANS.
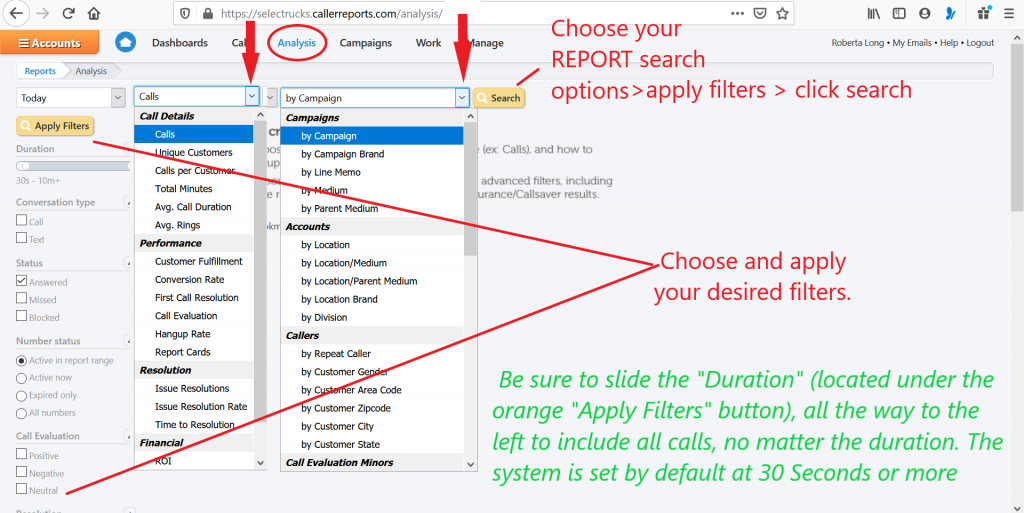
(1) From you dashboard click “Analysis” > New Analysis Report > Select Preferences > Apply Filters in the left menu > Click Search
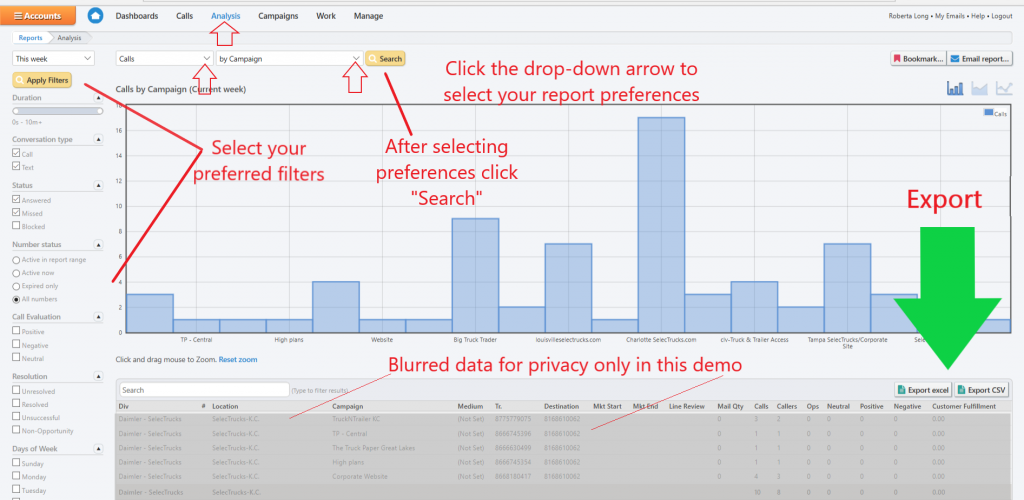
Click “Export” bottom right in the report.
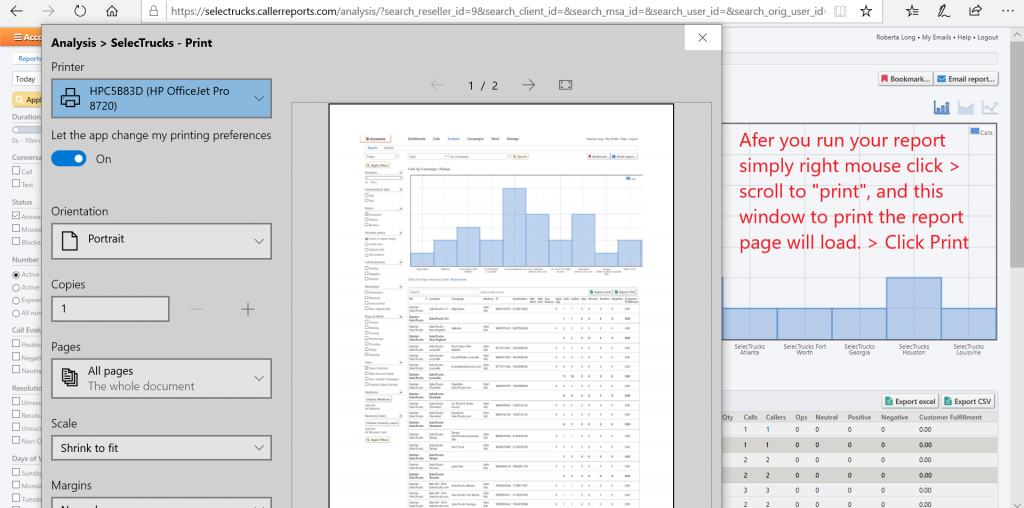
ANS. Yes, by “right clicking” on the report you can print directly from the system. You may also export the “All Calls” Report under “Calls” in the menu by exporting into excel and printing.
The screenshot below reflects what you should see when you run an Analysis Report, Right Mouse Click and Scroll to the print option. You may also choose to export and print any of these reports.
(2) If you would like to have only the graph to drop into your own document, simply click “ctrl”, (lower left key on your keyboard) > hold it down while you click “prt sc”, (normally located at the top row of your keyboard), although some may vary. That action copies the screen.
Next: Open the program “Paint” on your computer. (Nearly all, if not all computers have this program free) >
Next: Click the “ctrl” key again, and then click your “v”. This will paste the screenshot into paint. You can now crop the graph and save it to your computer to insert into a document.
After Cropping in Paint
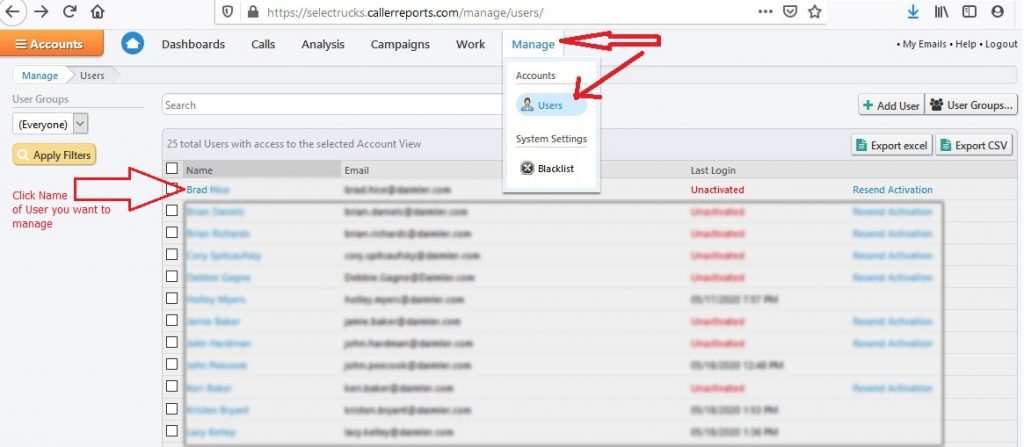
ANS. Not all users have this level of access. For those who don’t, simply call toll free: 1.866.719.8684 or email us the name and email of the user you would like to add, and we’ll add them for you asap! For those who do have access simply follow these steps.
1. Log in.
2. From your dashboard you will see the following menu options at the top of the screen;
Dashboard • Call • Analysis Campaigns • Work • Manage
Click “Manage”. A drop down will open.
3. Select “Users” A new screen will load with your users.
4. Select the name of the user you want to manage.
ANS. You may call us Call Toll free: 1.866-719-8684 or You may email your account manager and we will set it up for you asap!
If you have “System Administrator Access”, you may follow these instructions;
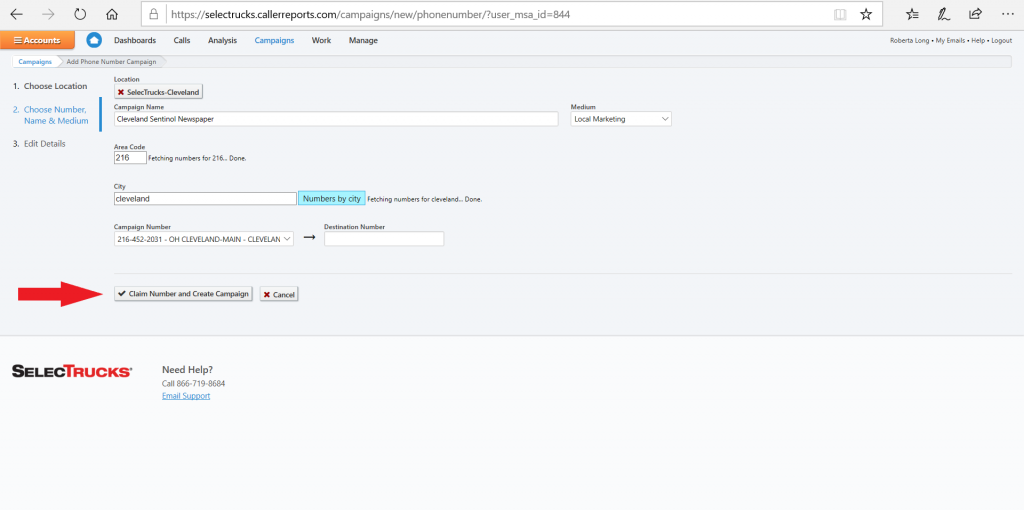
(1) From your dashboard go to “Campaigns” > Scroll to “Create Phone Number Campaign
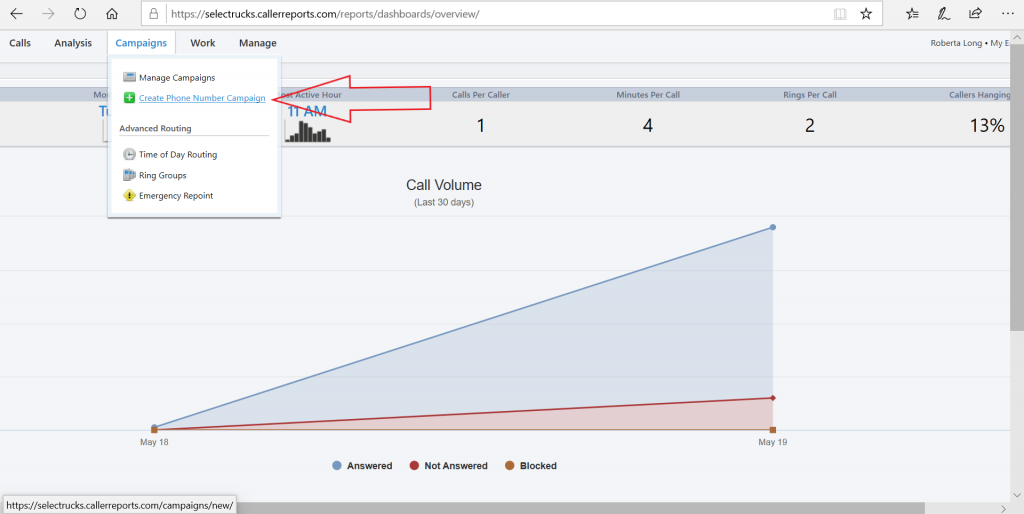
(2) Click the “Create new standard campaign” button.
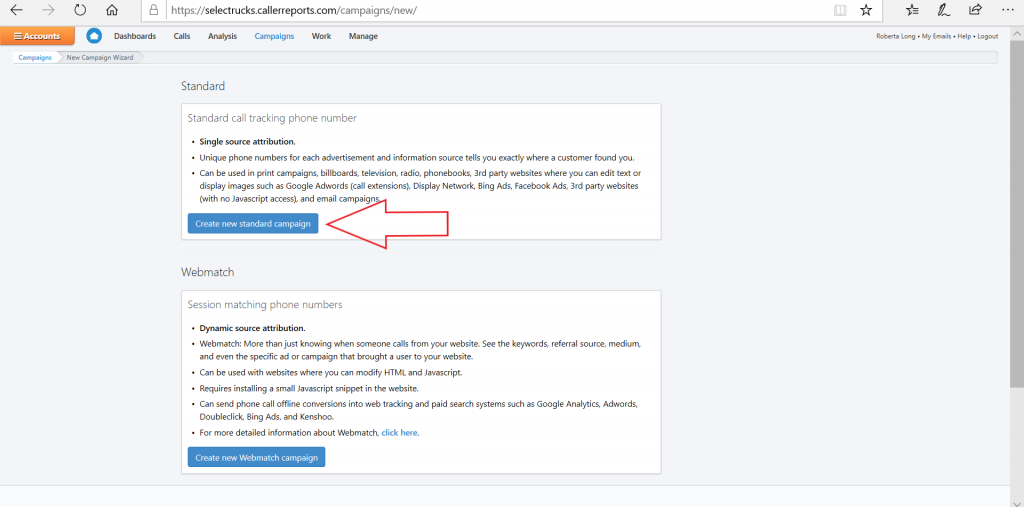
(3) Select the location you want to create the campaign for and click “Choose Location Button” (bottom left).
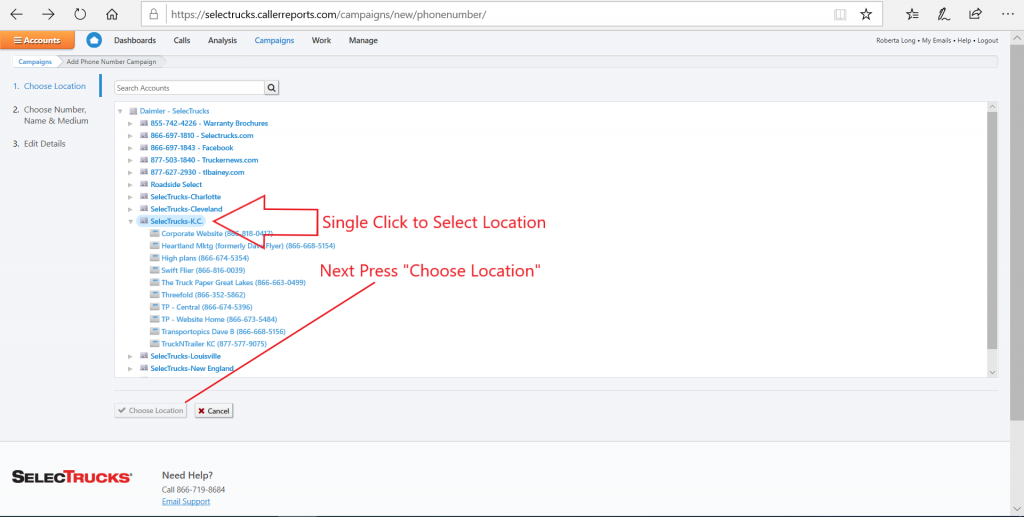
(4) Press Claim Number and Create Campaign
ANS. Yes, have them call and said you referred them, depending on how many locations they have dictates how much you’ll save ie. they have 10 locations, you save 10% for 10 months (not including minutes) if they have 20 locations, you’ll save 20% for 20 months (20% for 20 months is the most you can save, unless we discuss beforehand)